Defining Employee Work Hours and Resource Use
To get to Schedule Manager, type schedules into the Convobar, or go to Meevo > Schedules > Schedules.
To define employee work hours
- Locate one or more employees whose schedule you want to edit. Employees appear across the top row of the table in alphabetical order according to Employee Code.
Note: For an employee to appear in Schedule Manager, Show on Schedule must be selected in the employee's profile.
- Select one or more days to reveal the Schedule Editor. Some tips on using the editor:
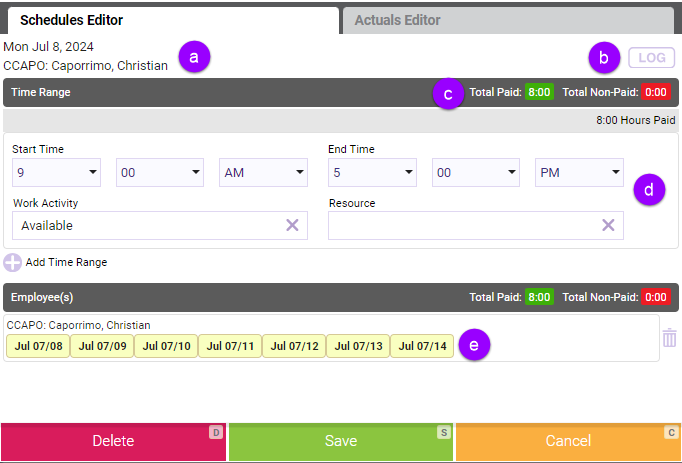
- You can select multiple days across multiple columns by selecting the days, and you can continue to select days while the Schedule Editor is open.
- Select the employee's name in the header row to select all days of the week for that employee.
- If you select multiple days, the Time Range will reflect the first day you selected.
- As you select days, the employees and the selected work dates appear in the Employees section. These can be deselected by selecting delete.

- Time Range: Define the Start and End Time. Upon save, all selected days will be updated with the configured Time Range, Work Activity, and Resource (if applicable).
- Add time range: Adds another time range row for you to define. These additional time ranges can be removed by selecting delete.
- Work Activity: Applies a defined Work Activity for the time range.
- Resources: Selecting a resource here will schedule the employee in this resource. This field is present if you selected one or more days for a single employee. This field is described further below.
- Add time range: Adds another time range row for you to define. These additional time ranges can be removed by selecting delete.
- When finished, select Save.
To schedule an employee in a resource
If you selected one or more days for a single employee, you can schedule the employee in a resource from the Resources field. When you schedule an employee in a resource:
- You cannot schedule more than one employee in a resource for a given time range.
- If the employee receives a booking for a service that requires a resource, the Appointment Editor automatically selects that resource.
- The employee can be booked in another resource by selecting a different resource in Appointment Editor, as long as the service is also associated with that resource.