Scheduling Employees and Resources
Tip: To get to Schedule Manager, type schedules into the Convobar, or go to Meevo > Schedules > Schedules.
Use Schedule Manager to define an employee's work hours, Work Activities, and scheduled Resource (if applicable). Before you define an employee's schedule, it's important to understand how an employee gets added to the Schedule Manager and eventually the Appointment Book:
- For an employee to appear in Schedule Manager: The option Show on Schedule must be enabled in the employee's profile.
- For an employee to appear in the Appointment Book: They must be scheduled (in Schedule Manager) for a Work Activity that has Show on Appointment Book enabled in the Work Activity definition.
- For a resource to appear in the Appointment Book: When you add a Resource to Meevo, it automatically appears in the Appointment Book in Resource view. The Resource's available hours are dependent on your business hours settings.
Note: Resources do not get "scheduled" in Schedule Manager as employees do. Instead, an employee can be scheduled in a Resource by selecting a Resource from the Resource drop-down in Schedules Editor.
Selecting employees and days to schedule
These steps apply to creating a new schedule as well as editing an existing schedule.
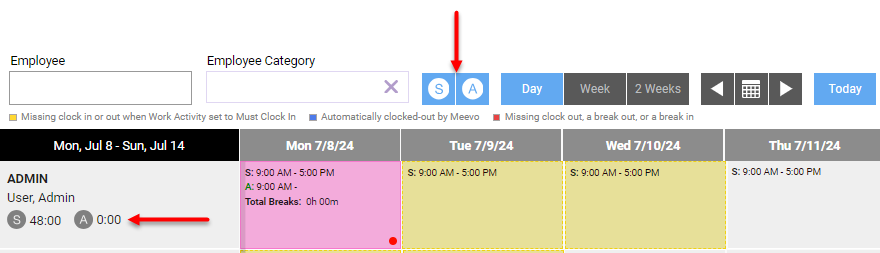
- First, make sure Schedule View is active (shown in the image below). This view must be enabled in order to use the Schedules Editor.
- Then, select a schedule view (Day, Week, or 2-Week) from the toolbar.

- Select which days and employees you want to schedule or update. Employees appear in the left column in alphabetical order according to their Employee Code.
- To select all of the days in the row (in Week and 2-Week view), select the cell with the employee's name.

- To schedule multiple days, simply select the days. This can be done across multiple employees as well.
Tip: After selecting a day, the Schedule Editor slides out. You can continue to select days while the Schedule Editor is open.
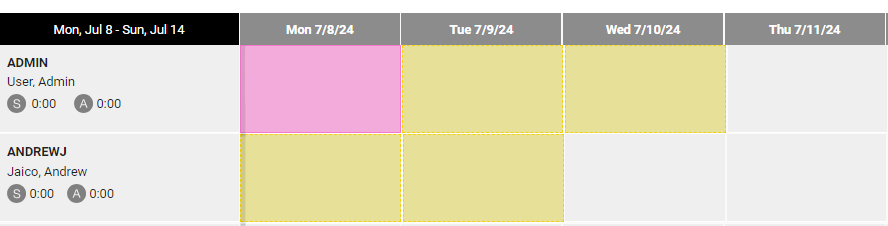
- The first day you select is highlighted pink, and days you select after that are highlighted in yellow.
- When you select multiple days, the Time Range in Schedule Editor will reflect the first day you selected.
- Within the employee's cell are details on the employee's scheduled and actual hours for the selected days, providing you with a quick look at what's currently scheduled. What actually appears there depends on which Schedules/Actuals views are enabled; i.e. when Schedule View is active, "scheduled" hours appear, and when Actuals View is active, "actual" hours appear. In the image below, both views are active, so both hours appear for the employee.
Scheduling employees for the selected days
These steps apply to creating a new schedule as well as editing an existing schedule.
Tip: If you have several employees with identical schedules, use the "Copy" function to copy an employee's existing schedule and apply it to others. See Copying Schedules for more details.
- After you select a day on the calendar, the Editor slides out. With Schedule View enabled, the editor defaults to the Schedules Editor tab.
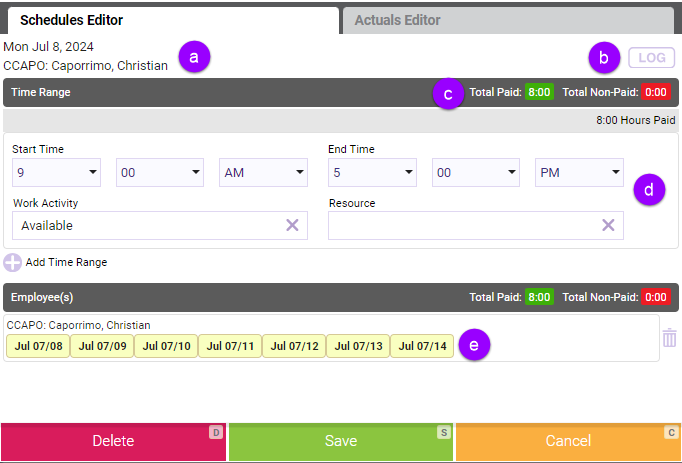
- This is the current employee and date being scheduled. If you selected multiple employees and days, the first you selected of each appears here.
- The Schedules Editor Log modal displays details on who created or changed an employee schedule. The modal displays information that is specific to the current view (Schedules Editor or Actuals Editor).
- This is the Total Paid and Total Non-Paid hours for that shift given the entered Start Time, End Time, and Work Activity. The Paid activity option in a Work Activity's definition determines whether or not the employee should earn wages during that time.
- These fields are where you define the actual shift for the employee(s). See Step 2 below for more!
- As you select days and employees, the employees and the selected work days appear in the Employees section. You can remove an employee and their days from Schedule Editor by selecting delete (the trash can).
- Now define the employee's hours and Work Activity.
- First, define the Start Time and End Time, as well as the assigned Work Activity for the shift.
- Selecting a Resource here will schedule the employee in this resource. The Resource field is available if you are scheduling a single employee. See our resource details further below for more on scheduling an employee in a resource.
- To set up several time ranges, select Add Time Range. This adds another shift row for you to configure. If needed, you can remove additional time ranges by selecting delete (the trash can).
- When you're ready to commit the schedule, select Save on the Schedule Editor. All selected days will be updated with the configured shift details.
Notes on editing an existing employee schedule
- Days that coincide with archived service payroll periods are locked and cannot be edited.
- If a schedule change would impact the employee's currently scheduled appointments, Schedule Manager will display a warning about this and allow you to continue if desired.
- Changes to the Schedule Manager do not impact the Appointment Book; that is, existing appointments are not impacted by changes made in Schedule Manager.
To schedule an employee in a resource
If you selected one or more days for a single employee, you can schedule the employee in a resource from the Resources field:
- You cannot schedule more than one employee in a resource for a given time range.
- If the employee receives a booking for a service that requires a resource and the employee is scheduled in that resource, the Appointment Editor automatically selects that resource.
- The employee can be booked in another resource by selecting a different resource in Appointment Editor, as long as the service is also associated with that resource.